「PIONEチュートリアル-PNML」の版間の差分
(→基本8(入力のor結合)) |
(→基本11(出力同期化)) |
||
| (同じ利用者による、間の5版が非表示) | |||
| 行1,008: | 行1,008: | ||
=== 基本9(出力分解) === | === 基本9(出力分解) === | ||
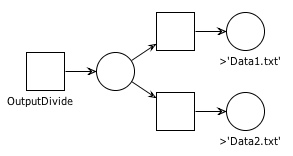
| + | ルールのトランジションから無名のプレースに繋ぎ、そこから無名のトランジションに接続すると出力分解を行います。これは処理による出力ファイルの内いずれかを出力する方法です。<br> | ||
| + | <br> | ||
| + | |||
[[PNML]]ファイル<br> | [[PNML]]ファイル<br> | ||
[[画像:PIONE-PNML-Basic9.png]]<br> | [[画像:PIONE-PNML-Basic9.png]]<br> | ||
| 行1,013: | 行1,016: | ||
[[マークダウン]]ファイル<br> | [[マークダウン]]ファイル<br> | ||
<pre> | <pre> | ||
| + | # OutputDivide.pione | ||
| + | |||
| + | ## OutputDivide | ||
| + | |||
| + | ``` | ||
| + | date > {$O[1]} | ||
| + | ``` | ||
</pre> | </pre> | ||
| + | 出力ファイル名がData1.txtまたはData2.txtのいずれかになります。<br> | ||
<br> | <br> | ||
=== 基本10(入力並列化) === | === 基本10(入力並列化) === | ||
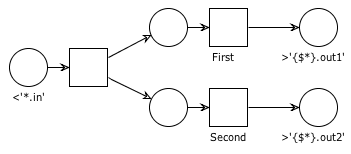
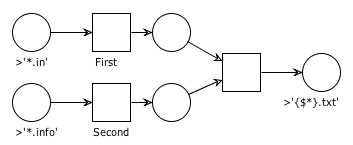
| − | + | 1つの入力ファイルから無名のトランジションに繋ぎ、複数の無名プレースそしてルールトランジションに繋ぐと並列処理を行うことができます。<br> | |
<br> | <br> | ||
| 行1,025: | 行1,036: | ||
[[マークダウン]]ファイル<br> | [[マークダウン]]ファイル<br> | ||
<pre> | <pre> | ||
| + | # Parallel.pione | ||
| + | |||
| + | ## First | ||
| + | Multiply 2 to all input data. | ||
| + | |||
| + | ``` | ||
| + | awk '{print $1*2}' {$I[1]} > {$O[1]} | ||
| + | ``` | ||
| + | |||
| + | ## Second | ||
| + | Add 1 to all input data. | ||
| + | |||
| + | ``` | ||
| + | awk '{print $1+1}' {$I[1]} > {$O[1]} | ||
| + | ``` | ||
</pre> | </pre> | ||
<br> | <br> | ||
=== 基本11(出力同期化) === | === 基本11(出力同期化) === | ||
| − | <br> | + | 複数のルールトランジションをそれぞれ無名プレースを経由して1つの無名トランジションへ繋ぐとここまでの出力ファイルについて同期を取ることができます。<br> |
[[PNML]]ファイル<br> | [[PNML]]ファイル<br> | ||
| 行1,036: | 行1,062: | ||
[[マークダウン]]ファイル<br> | [[マークダウン]]ファイル<br> | ||
<pre> | <pre> | ||
| + | # Synchro.pione | ||
| + | |||
| + | ## First | ||
| + | Multiply 2 to all input data. | ||
| + | |||
| + | ``` | ||
| + | awk '{print $1*2}' {$I[1]} > {$O[1]} | ||
| + | ``` | ||
| + | |||
| + | ## Second | ||
| + | Add 1 to all input data. | ||
| + | |||
| + | ``` | ||
| + | awk '{print $1+1}' {$I[1]} > {$O[1]} | ||
| + | ``` | ||
</pre> | </pre> | ||
<br> | <br> | ||
2015年3月27日 (金) 08:12時点における最新版
PIONEは、直接、PIONE定義書を記述する事もできますが、PNMLを用いて、ペトリネットの形式で記述することもできます. WoPeD(推奨)により、ペトリネットを記述し、PNML形式で保存します。それぞれのアクションは、マークダウン形式で記述する事ができます.
WoPeDを使ったPIONE定義書の作成(基本)
ここではWoPeDを使って、PNMLファイルを作成し、PIONE定義書を作成するチュートリアルを行います。
まず、WoPeDを起動し、新規作成するためにFileのNewを選択します。
新規作成したファイル内のProcess上で右クリックすると、アイテムを選択することができます。
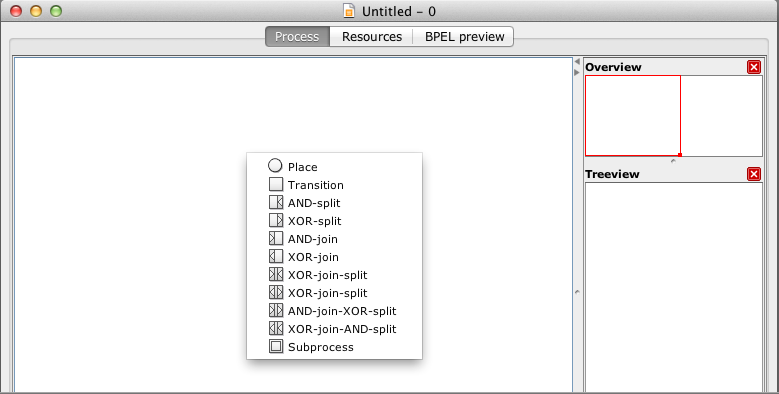
PIONE定義書を作成する上では上部2つの"○"(Place)と"□"(Transition)を使用します。主に"○"(Place)はファイルなどの入出力データを指し、"□"(Transition)はRuleなどの処理を指します。そして、"○"(Place)と"□"(Transition)の間をドラッグ操作による矢印(Annotation)でつなぐと、入力ファイルからある処理を経て出力ファイルを作成するフローが完成します。なお、#を使用すると以降の文字列をコメントにできる仕様ですが、現バージョンでは未実装です。

WoPeDでフローを作成したら、次は"□"(Transition)の中身を作成します。こちらは下記のようなマークダウン形式ファイルを作成します。##が意味持っていることに注意して下さい。
## Transition名

ここにコメントを記述することができます。

```
Transition内のAction
```

## 次のTransition名
.
.
.
PNMLファイルとマークダウンファイルを作成した後はpione compileによって、PIONE定義書へコンパイルすることができます。
$ pione compile (pnmlファイル) --action (アクション定義ファイル) > (PIONE定義書ファイル名)
基本1(特定のファイルを出力する)
では、PIONEチュートリアル#基本1(特定のファイルを出力する)と同様にHelloプログラムを作ってみましょう。
まず、下記のようなHelloWorld.pnmlを作成します。このとき出力ファイルの">"はMain Ruleにおける出力を指しています。("<"はMain Ruleの入力)

次に下記のようなHelloWorld.mdを作成します。
# HelloWorld.pione

## Hello
Here, you can write Comment.


```
echo "Hello PIONE world !" > {$O[1]}
```
このファイルはこちらからダウンロードできます。
最後にコンパイルを行います。
pione compile HelloWorld.pnml --action HelloWorld.md > HelloWorld.pione
コンパイル後のPIONE定義書
Rule Main
  output 'message.txt'
Flow
  rule Hello
End

Rule Hello
  output 'message.txt'
Action
  echo "Hello PIONE world !" > {$O[1]}
End
PIONEチュートリアル#基本1(特定のファイルを出力する)と同様の機能を持つファイルHelloWorld.pioneが作成されました。
実行結果
/Basic1$ pione-client HelloWorld.pione -b HelloWorld
  ==> &Anonymous:Root([],{})
    --> Rule Application: &Anonymous:Root([],{})
      --> Distribution: &Anonymous:Root([],{})
            >>> &Anonymous:Main([],{})
  ==> &Anonymous:Main([],{})
    --> Rule Application: &Anonymous:Main([],{})
      --> Distribution: &Anonymous:Main([],{})
            >>> &Anonymous:Hello([],{})
  ==> &Anonymous:Hello([],{})
   SH ------------------------------------------------------------
   SH echo "Hello PIONE world !" > message.txt
   SH ------------------------------------------------------------
  <== &Anonymous:Hello([],{})
      <-- Distribution: &Anonymous:Main([],{})
    <-- Rule Application: &Anonymous:Main([],{})
      <-- Distribution: &Anonymous:Root([],{})
  <== &Anonymous:Main([],{})
    <-- Rule Application: &Anonymous:Root([],{})
  <== &Anonymous:Root([],{})
/Basic1$ cat HelloWorld/output/message.txt
Hello PIONE world !
同様にHelloWorld/output/message.txt へHello PIONE world !が出力されています。
基本2(複数ルールによる処理)
少しルールを増やした例を試してみましょう。
今回は各行に1つずつの数値が記述されている全ての.inファイルに対して、各数に2を掛ける処理(First)、さらに1を足す処理(Second)を施して、.outを出力するルールを作成します。
PNMLファイル

上記の2つ目のplaceでの{$*}はPIONEの記述における{$I[1]}を表しています。また#はコメントアウトでpione compileにて変換するときには無視されますので、自由に説明などを加えることができます。
マークダウンファイル
# Serial2.pione

## First
Multiply 2 to all input data.

```
awk '{print $1*2}' {$I[1]} > {$O[1]}
```

## Second
Add 1 to all input data.

```
awk '{print $1+1}' {$I[1]} > {$O[1]}
```
このファイルはこちらからダウンロードできます。
コンパイル後のPIONE定義書
Rule Main
  input '*.in'
  output '*.out'
Flow
  rule First
  rule Second
End

Rule First
  input '*.in'
  output '{$*}.route'
Action
  awk '{print $1*2}' {$I[1]} > {$O[1]}
End

Rule Second
  input '*.route'
  output '{$*}.out'
Action
  awk '{print $1+1}' {$I[1]} > {$O[1]}
End
PIONEの実行結果
入力ファイル
| test1.in | test2.in | test3.in | test4.in | test5.in |
3 5 |
2 4 |
7 1 |
8 9 6 |
1 2 3 4 5 6 7 8 9 |
出力ファイル
| test1.out | test2.out | test3.out | test4.out | test5.out |
7 11 |
5 9 |
15 3 |
17 19 13 |
3 5 7 9 11 13 15 17 19 |
入力ファイルの各データが×2の後に+1の処理が施され、PIONEチュートリアル#基本5(直列:フロールールの設定 )と同様の処理を作成することができました。
基本3(複数種類の入出力がある処理)
複数種類の入出力がある少し複雑な処理を記述してみましょう。
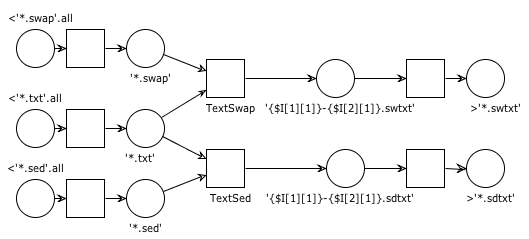
今回は.txtファイルを元に.swapファイルで指定した行数を入れ替えたファイル.swtxtと.sedファイルで指定した文字列の置換を行ったファイル.sdtxtをそれぞれ出力します。
PNMLファイル
マークダウンファイル
# TextSwapSed.pione

## TextSwap

```
cp {$I[1]} intmp;
while read line ; \
do \
	i1=$(echo $line | awk '{printf("%d", $1)}'); \
	i2=$(echo $line | awk '{printf("%d", $2)}'); \
	lnum=$(wc -l intmp | awk '{printf("%d", $1)}'); \
	c1=$(expr $lnum - $i2); \
	c2=$(expr $i2 - $i1); \
	top=$( head -$i1 intmp ); \
	middle=$( head -$i2 intmp | tail -$c2 ); \
	bottom=$( tail -$c1 intmp ); \
	t1=$(expr $i1 - 1); \
	m1=$(expr $c2 - 1); \
	top1=$( echo "$top" | head -$t1 ); \
	str1=$( echo "$top" | tail -1 ); \
	middle1=$( echo "$middle" | head -$m1 ); \
	str2=$( echo "$middle" | tail -1 ); \
	echo "$top1" > outtmp; \
	echo "$str2" >> outtmp; \
	echo "$middle1" >> outtmp; \
	echo "$str1" >> outtmp; \
	echo "$bottom" >> outtmp; \
	cat outtmp | sed '/^$/d' > intmp; \
done < {$I[2]};
mv intmp {$O[1]};
```

## TextSed

```
cp {$I[1]} intmp;
while read line ; \
do \
	str1=$(echo $line | awk '{printf("%s", $1)}'); \
	str2=$(echo $line | awk '{printf("%s", $2)}'); \
	sed -e "s/$str1/$str2/g" intmp > outtmp; \
	cat outtmp | sed '/^$/d' > intmp; \
done < {$I[2]};
mv intmp {$O[1]};
```
このファイルはこちらからダウンロードできます。
コンパイル済みPIONE定義書の実行結果
入力ファイル
aaa aab aba abb baa bab bba bbb |
abc acb bac bca cab cba |
1 3 4 5 1 6 |
1 2 1 3 1 4 1 5 1 6 |
a c bc bd dc DC |
abc ddd aaa eee bc XX |
| Input1.txt | Input2.txt | line1.swap | line2.swap | ref1.sed | ref2.sed |
出力ファイル
bab aab aaa baa abb aba bba bbb |
bab aaa aab aba abb baa bba bbb |
ccc ccb cbd cbb bDC bdb bbd bbb |
eee aab aba abb baa bab bba bbb |
| Input1-line1.swtxt | Input1-line2.swtxt | Input1-ref1.sdtxt | Input1-ref2.sdtxt |
cba acb abc cab bca bac |
cba abc acb bac bca cab |
cbd ccb bDC bDC ccb cbd |
ddd acb bac XXa cab cba |
| Input2-line1.swtxt | Input2-line2.swtxt | Input2-ref1.sdtxt | Input2-ref2.sdtxt |
それぞれの.txtファイルに付いて.sed, .swapファイルによる変換が行われるので、計8つのファイルが出力されます。
基本4(パラメータの定義)
次はパラメータをPNMLで定義してみましょう。
#基本2(複数ルールによる処理)から掛ける値と足す値をパラメータから取得する処理にしてみます。
PNMLファイル

マークダウンファイル
# Serial2-4.pione

## First
Multiply a specified number to all input data.

```
awk '{print $1*{$d1}}' {$I[1]} > {$O[1]}
```

## Second
Add a specified number to all input data.

```
awk '{print $1+{$d2}}' {$I[1]} > {$O[1]}
```
このファイルはこちらからダウンロードできます。
※ 現在のPIONE(v0.4.2)では未サポート
基本5(条件文)
条件文をPNMLで表現してみましょう。
if文
まずはif文を作成してみましょう。
#基本2(複数ルールによる処理)から掛ける処理と足す処理をモードによって切り替えるできるようにしてみます。
if分岐
PNMLファイル

mode=1のときは2を掛け、それ以外では1を足すように分岐しました。
マークダウンファイルは#基本2(複数ルールによる処理)と同じです。
このファイルはこちらからダウンロードできます。
コンパイル後のPIONE定義書
Rule Main
  input '*.in'
  output '*.out'
Flow
  if $mode == 1
    rule First
  else
    rule Second
  end

End

Rule First
  input '*.in'
  output '{$*}.out'
Action
  awk '{print $1*2}' {$I[1]} > {$O[1]}
End

Rule Second
  input '*.in'
  output '{$*}.out'
Action
  awk '{print $1+1}' {$I[1]} > {$O[1]}
End
入力ファイル
| test1.in | test2.in | test3.in | test4.in | test5.in |
3 5 |
2 4 |
7 1 |
8 9 6 |
1 2 3 4 5 6 7 8 9 |
mode=1で実行(必ずmodeを設定して実行します。)
/Basic5$ pione-client Serial5.pione -b Serial5 -i SerialInput/ --params='{mode:1}'
"{mode:1}"
  ==> &Anonymous:Root([.DS_Store,test1.in,test2.in,...],{})
    --> Rule Application: &Anonymous:Root([.DS_Store,test1.in,test2.in,...],{})
      --> Distribution: &Anonymous:Root([.DS_Store,test1.in,test2.in,...],{})
            >>> &Anonymous:Main([test1.in],{mode:(<i>1)})
            >>> &Anonymous:Main([test2.in],{mode:(<i>1)})
            >>> &Anonymous:Main([test3.in],{mode:(<i>1)})
            >>> &Anonymous:Main([test4.in],{mode:(<i>1)})
            >>> &Anonymous:Main([test5.in],{mode:(<i>1)})
  ==> &Anonymous:Main([test1.in],{mode:(<i>1)})
    --> Rule Application: &Anonymous:Main([test1.in],{mode:(<i>1)})
      --> Distribution: &Anonymous:Main([test1.in],{mode:(<i>1)})
            >>> &Anonymous:First([test1.in],{})

-中略-

  <== &Anonymous:First([test5.in],{})
      <-- Distribution: &Anonymous:Main([test5.in],{mode:(<i>1)})
    <-- Rule Application: &Anonymous:Main([test5.in],{mode:(<i>1)})
      <-- Distribution: &Anonymous:Root([.DS_Store,test1.in,test2.in,...],{})
  <== &Anonymous:Main([test5.in],{mode:(<i>1)})
    <-- Rule Application: &Anonymous:Root([.DS_Store,test1.in,test2.in,...],{})
  <== &Anonymous:Root([.DS_Store,test1.in,test2.in,...],{})
mode=1を指定すると2を掛ける処理が実行されました。
出力ファイル
| test1.out | test2.out | test3.out | test4.out | test5.out |
6 10 |
4 8 |
14 2 |
16 18 12 |
2 4 6 8 10 12 14 16 18 |
mode=0で実行
/Basic5$ pione-client Serial5.pione -b Serial5 -i SerialInput/ --params='{mode:0}'
"{mode:0}"
  ==> &Anonymous:Root([.DS_Store,test1.in,test2.in,...],{})
    --> Rule Application: &Anonymous:Root([.DS_Store,test1.in,test2.in,...],{})
      --> Distribution: &Anonymous:Root([.DS_Store,test1.in,test2.in,...],{})
            >>> &Anonymous:Main([test1.in],{mode:(<i>0)})
            >>> &Anonymous:Main([test2.in],{mode:(<i>0)})
            >>> &Anonymous:Main([test3.in],{mode:(<i>0)})
            >>> &Anonymous:Main([test4.in],{mode:(<i>0)})
            >>> &Anonymous:Main([test5.in],{mode:(<i>0)})
  ==> &Anonymous:Main([test1.in],{mode:(<i>0)})
    --> Rule Application: &Anonymous:Main([test1.in],{mode:(<i>0)})
      --> Distribution: &Anonymous:Main([test1.in],{mode:(<i>0)})
            >>> &Anonymous:Second([test1.in],{})

-中略-

  <== &Anonymous:Second([test5.in],{})
      <-- Distribution: &Anonymous:Main([test5.in],{mode:(<i>0)})
    <-- Rule Application: &Anonymous:Main([test5.in],{mode:(<i>0)})
      <-- Distribution: &Anonymous:Root([.DS_Store,test1.in,test2.in,...],{})
  <== &Anonymous:Main([test5.in],{mode:(<i>0)})
    <-- Rule Application: &Anonymous:Root([.DS_Store,test1.in,test2.in,...],{})
  <== &Anonymous:Root([.DS_Store,test1.in,test2.in,...],{})
mode=1以外なので、1を足す処理が実行されました。
出力ファイル
| test1.out | test2.out | test3.out | test4.out | test5.out |
4 6 |
3 5 |
8 2 |
9 10 7 |
2 3 4 5 6 7 8 9 10 |
出力if分岐
if文には他に出力if分岐という方法で作成することもできます。条件により出力ファイル名を選択できます。mode=1のときは.out1、それ以外は.out2として出力するように作成してみましょう。
PNMLファイル
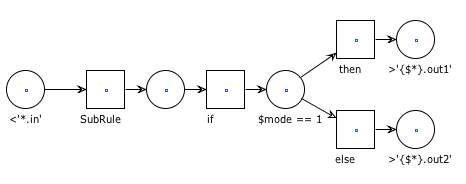
出力if分岐はifのトランジションの前に無名のプレースでつなぎます。
マークダウンファイル
# Serial5-1.pione

## SubRule
Multiply 2 or Add 1 to all input data.

```
if [ {$mode} -eq 1 ]; then
	awk '{print $1*2}' {$I[1]} > {$O[1]}
else
	awk '{print $1+1}' {$I[1]} > {$O[1]}
fi
```
今回はmodeにより処理も異なるので、ここでも条件文を使用しています。同じ処理でも出力ファイル名のみを変えたい場合にはPNMLファイルのみに出力if分岐を使用するだけで十分です。
case文
次はcase文を作成してみましょう。こちらも同様にcase分岐と出力case分岐の2通りがあります。
case分岐
PNMLファイル

マークダウンファイルは#基本2(複数ルールによる処理)と同じです。
出力case分岐
出力ファイルの分岐はcaseでも作成できます。
PNMLファイル
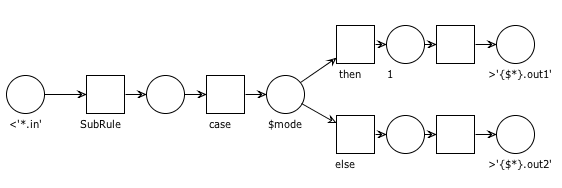
出力if分岐と同様にifのトランジションの前に無名のプレースでつなぎます
基本6(入力にnullを使用する)
プレースにnullを使用すると、これはファイル無しを表します。入力ファイルに設定してみましょう。
# date.pione

## Date
Output the current date and time.

```
date > {$O[1]}
```
このファイルはこちらからダウンロードできます。
コンパイル後のPIONE定義書
Rule Main
  input null
  output 'date.log'
Flow
  rule Date
End

Rule Date
  input null
  output 'date.log'
Action
  date > {$O[1]}
End
単に入力ファイルをnullのみにした場合、input無しと同じ動作となるだけですが、他の記法と組み合わせることで入力データや発火条件に工夫を加えることができます。
例えば、入力ファイルが無い場合に新規作成、有る場合は追記する処理を行いたい場合は下記のようにします。
PNMLファイル

マークダウンファイル
# date2.pione

## Date
Output the current date and time.

```
cp {?$I[1]} {$O[1]}
date >> {$O[1]}
```
このファイルはこちらからダウンロードできます。
コンパイル後のPIONE定義書
Rule Main
  input '*.in' or null
  output 'date.log'
Flow
  rule Date
End

Rule Date
  input '*.in' or null
  output 'date.log'
Action
  cp {?$I[1]} {$O[1]}
  date >> {$O[1]}
End
基本7(ランダム適用)
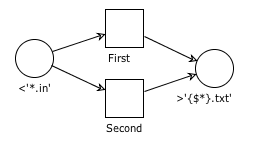
1プレースから複数のトランジションに接続している場合はランダムにルールを実行します。
# Random.pione

## First
Multiply 2 to all input data.

```
awk '{print $1*2}' {$I[1]} > {$O[1]}
```

## Second
Add 1 to all input data.

```
awk '{print $1+1}' {$I[1]} > {$O[1]}
```
各ファイル毎に2を掛ける処理か1を足す処理のいずれかを行います。
基本8(入力のor結合)
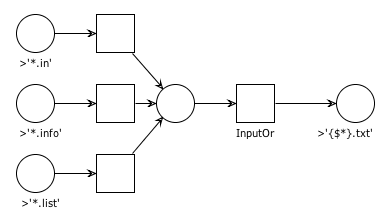
各入力をそれぞれ無名のトランジションで繋ぎ、これらをさらに無名のプレースに繋いでからルールへ接続することにより入力ファイルのor結合ができます。
# InputOr.pione

## InputOr

```
cp {$I[1]} {$O[1]}
```
この処理では拡張子がin, info, listのファイルを全てtxtにする処理を行っています。
基本9(出力分解)
ルールのトランジションから無名のプレースに繋ぎ、そこから無名のトランジションに接続すると出力分解を行います。これは処理による出力ファイルの内いずれかを出力する方法です。
# OutputDivide.pione

## OutputDivide

```
date > {$O[1]}
```
出力ファイル名がData1.txtまたはData2.txtのいずれかになります。
基本10(入力並列化)
1つの入力ファイルから無名のトランジションに繋ぎ、複数の無名プレースそしてルールトランジションに繋ぐと並列処理を行うことができます。
# Parallel.pione

## First
Multiply 2 to all input data.

```
awk '{print $1*2}' {$I[1]} > {$O[1]}
```

## Second
Add 1 to all input data.

```
awk '{print $1+1}' {$I[1]} > {$O[1]}
```
基本11(出力同期化)
複数のルールトランジションをそれぞれ無名プレースを経由して1つの無名トランジションへ繋ぐとここまでの出力ファイルについて同期を取ることができます。
# Synchro.pione

## First
Multiply 2 to all input data.

```
awk '{print $1*2}' {$I[1]} > {$O[1]}
```

## Second
Add 1 to all input data.

```
awk '{print $1+1}' {$I[1]} > {$O[1]}
```
WoPeDを使ったPIONE定義書の作成(応用)
応用1(Eosのコマンドへの利用)
問題
Eosのコマンドを使った例を示します。
今回は3D画像(.ref3d)から指定した角度(.refangle)の2D投影像を作成するコマンドを作成してみましょう。
解答例
PNMLファイル

Ref3Dto2Dの出力ファイル名は.refangleの行数も関連しているため'*.ref2d'.allとして全てのファイルを出力の対象にしています。
マークダウンファイル
# Ref3Dto2D.pione

## Ref3Dto2D
Projection 3D to 2D depending on an angle.

```
num=1;
while [ "$line" != "$(tail -1 {$I[1]})" ] ; \
do \
	line=$(head -$num {$I[1]} | tail -1); \
	EA=$(echo $line | awk '{printf("%s", $1)}'); \
	ROT1=$(echo $line | awk '{printf("%s", $2)}'); \
	ROT2=$(echo $line | awk '{printf("%s", $3)}'); \
	ROT3=$(echo $line | awk '{printf("%s", $4)}'); \
	mrc3Dto2D -i {$I[2]} \
				-o "{$I[2][1]}-{$I[1][1]}-$num.ref2d" \
				-EulerMode $EA \
				-Rot1 $ROT1 $ROT1 1 \
				-Rot2 $ROT2 $ROT2 1 \
				-Rot3 $ROT3 $ROT3 1; \
	if [ -z "$line" ] ; then \
		break; \
	fi; \
	num=`expr $num + 1`; \
done;
```
このファイルはこちらからダウンロードできます。
コンパイル後
Rule Main
  input '*.ref3d'.all
  input '*.refangle'.all
  output '*.ref2d'
Flow
  rule Ref3Dto2D
End

Rule Ref3Dto2D
  input '*.refangle'
  input '*.ref3d'
  output '*.ref2d'.all
Action
  num=1;
  while [ "$line" != "$(tail -1 {$I[1]})" ] ; \
  do \
  	line=$(head -$num {$I[1]} | tail -1); \
  	EA=$(echo $line | awk '{printf("%s", $1)}'); \
  	ROT1=$(echo $line | awk '{printf("%s", $2)}'); \
  	ROT2=$(echo $line | awk '{printf("%s", $3)}'); \
  	ROT3=$(echo $line | awk '{printf("%s", $4)}'); \
  	mrc3Dto2D -i {$I[2]} \
  				-o "{$I[2][1]}-{$I[1][1]}-$num.ref2d" \
  				-EulerMode $EA \
  				-Rot1 $ROT1 $ROT1 1 \
  				-Rot2 $ROT2 $ROT2 1 \
  				-Rot3 $ROT3 $ROT3 1; \
  	if [ -z "$line" ] ; then \
  		break; \
  	fi; \
  	num=`expr $num + 1`; \
  done;
End
実行例
入力ファイル
このコマンドはmrcImage(3D)ファイル(.ref3d)及び下記のフォーマットの角度情報ファイル(.refangle)を入力として使用します。
EulerAngleMode Rot1 Rot2 Rot3
matrix3DFromEulerAngle(-i)と同じフォーマットで、それぞれの意味についてはオイラー角をご覧下さい。
入力ファイルがない場合は次のコード(ダウンロードファイルに含まれています)を使用するとサンプル入力データを作成します。なお、このサンプルデータはチュートリアル一覧#SampleDataを使用していますので、予めダウンロードしておく必要があります。
PNMLファイル
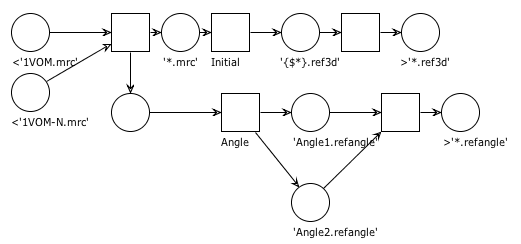
マークダウンファイル
# Initial.pione

## Initial
It brings ref3d files as Input.

```
	cp {$I[1]} {$O[1]};
```

## Angle
It creates angle files.

```
for (( rot1 = 0; rot1 < 360; rot1 += 30 )) ; \
do \
	for (( rot2 = 0; rot2 < 360; rot2 += 30 )) ; \
	do \
		rot22=`expr $rot2 + 15`; \
		echo "YOYS $rot1 $rot2 0" >> {$O[1]}; \
		echo "YOYS $rot1 $rot22 0" >> {$O[2]}; \
	done; \
done;
```
下記のコマンドで入力ファイルを用意します。
pione-client Initial.pione -b Initial -i "${EOS_HOME}/tutorial/SampleData"
.ref3dファイル
| 1VOM.ref3d | 1VOM-N.ref3d |
 |
 |
 |
 |
.refangleファイル
| Angle1.refangle | Angle2.refangle |
YOYS 0 15 0 YOYS 0 45 0 YOYS 0 75 0 YOYS 0 105 0 YOYS 0 135 0 YOYS 0 165 0 YOYS 0 195 0 YOYS 0 225 0 YOYS 0 255 0 -中略- YOYS 330 75 0 YOYS 330 105 0 YOYS 330 135 0 YOYS 330 165 0 YOYS 330 195 0 YOYS 330 225 0 YOYS 330 255 0 YOYS 330 285 0 YOYS 330 315 0 YOYS 330 345 0 |
YOYS 0 0 0 YOYS 0 30 0 YOYS 0 60 0 YOYS 0 90 0 YOYS 0 120 0 YOYS 0 150 0 YOYS 0 180 0 YOYS 0 210 0 YOYS 0 240 0 -中略- YOYS 330 60 0 YOYS 330 90 0 YOYS 330 120 0 YOYS 330 150 0 YOYS 330 180 0 YOYS 330 210 0 YOYS 330 240 0 YOYS 330 270 0 YOYS 330 300 0 YOYS 330 330 0 |
出力結果
下記のコマンドにより実行します。
pione-client Ref3Dto2D.pione -b Ref3Dto2D -i "Initial/output"
-i には.ref3dと.refangleのディレクトリを指定して下さい。
今回は出力ファイル数が多いので、lsコマンドで確認してみます。
/Advanced1$ ls Ref3Dto2D/output/
1VOM-Angle1-1.ref2d	1VOM-Angle1-74.ref2d	1VOM-Angle2-49.ref2d	1VOM-N-Angle1-23.ref2d	1VOM-N-Angle2-128.ref2d
1VOM-Angle1-10.ref2d	1VOM-Angle1-75.ref2d	1VOM-Angle2-5.ref2d	1VOM-N-Angle1-24.ref2d	1VOM-N-Angle2-129.ref2d
1VOM-Angle1-100.ref2d	1VOM-Angle1-76.ref2d	1VOM-Angle2-50.ref2d	1VOM-N-Angle1-25.ref2d	1VOM-N-Angle2-13.ref2d
1VOM-Angle1-101.ref2d	1VOM-Angle1-77.ref2d	1VOM-Angle2-51.ref2d	1VOM-N-Angle1-26.ref2d	1VOM-N-Angle2-130.ref2d
1VOM-Angle1-102.ref2d	1VOM-Angle1-78.ref2d	1VOM-Angle2-52.ref2d	1VOM-N-Angle1-27.ref2d	1VOM-N-Angle2-131.ref2d
1VOM-Angle1-103.ref2d	1VOM-Angle1-79.ref2d	1VOM-Angle2-53.ref2d	1VOM-N-Angle1-28.ref2d	1VOM-N-Angle2-132.ref2d
1VOM-Angle1-104.ref2d	1VOM-Angle1-8.ref2d	1VOM-Angle2-54.ref2d	1VOM-N-Angle1-29.ref2d	1VOM-N-Angle2-133.ref2d
1VOM-Angle1-105.ref2d	1VOM-Angle1-80.ref2d	1VOM-Angle2-55.ref2d	1VOM-N-Angle1-3.ref2d	1VOM-N-Angle2-134.ref2d
1VOM-Angle1-106.ref2d	1VOM-Angle1-81.ref2d	1VOM-Angle2-56.ref2d	1VOM-N-Angle1-30.ref2d	1VOM-N-Angle2-135.ref2d

-中略-

1VOM-Angle1-65.ref2d	1VOM-Angle2-4.ref2d	1VOM-N-Angle1-144.ref2d	1VOM-N-Angle2-119.ref2d	1VOM-N-Angle2-94.ref2d
1VOM-Angle1-66.ref2d	1VOM-Angle2-40.ref2d	1VOM-N-Angle1-15.ref2d	1VOM-N-Angle2-12.ref2d	1VOM-N-Angle2-95.ref2d
1VOM-Angle1-67.ref2d	1VOM-Angle2-41.ref2d	1VOM-N-Angle1-16.ref2d	1VOM-N-Angle2-120.ref2d	1VOM-N-Angle2-96.ref2d
1VOM-Angle1-68.ref2d	1VOM-Angle2-42.ref2d	1VOM-N-Angle1-17.ref2d	1VOM-N-Angle2-121.ref2d	1VOM-N-Angle2-97.ref2d
1VOM-Angle1-69.ref2d	1VOM-Angle2-43.ref2d	1VOM-N-Angle1-18.ref2d	1VOM-N-Angle2-122.ref2d	1VOM-N-Angle2-98.ref2d
1VOM-Angle1-7.ref2d	1VOM-Angle2-44.ref2d	1VOM-N-Angle1-19.ref2d	1VOM-N-Angle2-123.ref2d	1VOM-N-Angle2-99.ref2d
1VOM-Angle1-70.ref2d	1VOM-Angle2-45.ref2d	1VOM-N-Angle1-2.ref2d	1VOM-N-Angle2-124.ref2d
1VOM-Angle1-71.ref2d	1VOM-Angle2-46.ref2d	1VOM-N-Angle1-20.ref2d	1VOM-N-Angle2-125.ref2d
1VOM-Angle1-72.ref2d	1VOM-Angle2-47.ref2d	1VOM-N-Angle1-21.ref2d	1VOM-N-Angle2-126.ref2d
1VOM-Angle1-73.ref2d	1VOM-Angle2-48.ref2d	1VOM-N-Angle1-22.ref2d	1VOM-N-Angle2-127.ref2d
/Advanced1$
組み合わせの分だけの.ref2dファイルが作成されています。
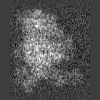
また、ダウンロードしたディレクトリ内にtiff画像を作成するコマンドもありますので、下記のコマンドを入力すると全ての.ref2dについてtiff画像を作成します。
pione-client Ref2DtoTiff.pione -b Ref2DtoTiff -i "Ref3Dto2D/output"
出力ファイルの一部
 |
 |
 |
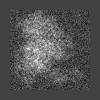 |
| 1VOM-Angle1-1.ref2d | 1VOM-Angle2-1.ref2d | 1VOM-N-Angle1-1.ref2d | 1VOM-N-Angle2-1.ref2d |

